Sample Looping Tool – Polyphone

Polyphone - sample looping tool

Polyphone – sample looping tool

PolyPhone – This tool’s intent is to provide a Graphical User Interface for creating .sf2 based sample libraries but I use it for it’s sample looping abilities when I’m creating .sfz based sample libraries.

To use this for looping, first create a new instrument (though there will be no need to save that instrument anywhere), using File > New. I just create an instrument called “temp” or “test”. It doesn’t matter because I won’t save the instrument.

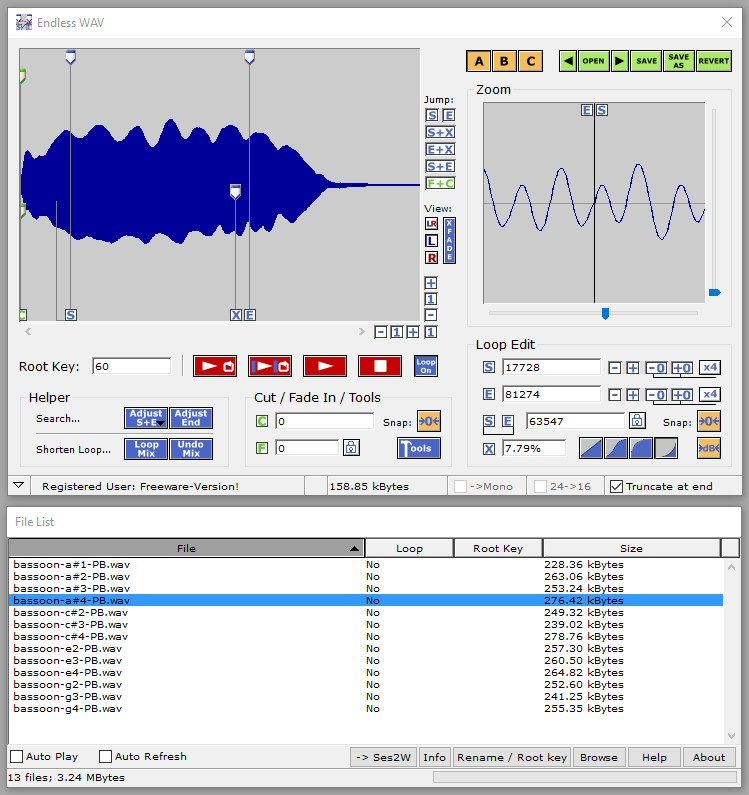
Next, drag and drop a .wav file over the “Samples” label on the left side. Having done that, a blue waveform as depicted above should appear.

The simplest thing to do next is to let Polyphone scan the entire waveform to find a good loop point. Pressing the yellow loop icon near the top will begin the quick process.

This often works but it’s sometimes best to restrict the search to an area of the wave form that you can see is mostly stable. I have done that in the picture above. To first set the end point of the search area, simply click the right mouse button somewhere in the wave form. Then click the left mouse button to set the start point.

As before, click the yellow loop icon to create a loop.

Press space bar to toggle the playing of the looped sample.

To try a different loop range, press Ctrl-z to undo the previous loop thus allowing you to set new loop begin and end points.

Once the loop is sounding good, select File > Export Samples to choose the directory where the looped sample is to be placed.

To continue, I drag another waveform over the “Sample” label and delete the previous sample from that list (just click the previous sample to highlight it and then press the delete key.

See also: Sample Looping Tool – Endless Wave
Sample Looping Tool – Endless Wave

Endless Wave - sample looper

Endless Wave – sample looper

Endless Wave – (the link leads to the Google translated page from German to English but the software itself is English) As I’ve been working to loop the individual samples in my orchestral sample library, this free tool has saved me a lot of time. Some fiddling may be necessary but with surprising frequency, it locates beginning and ending loop points that result in a seamless loop.

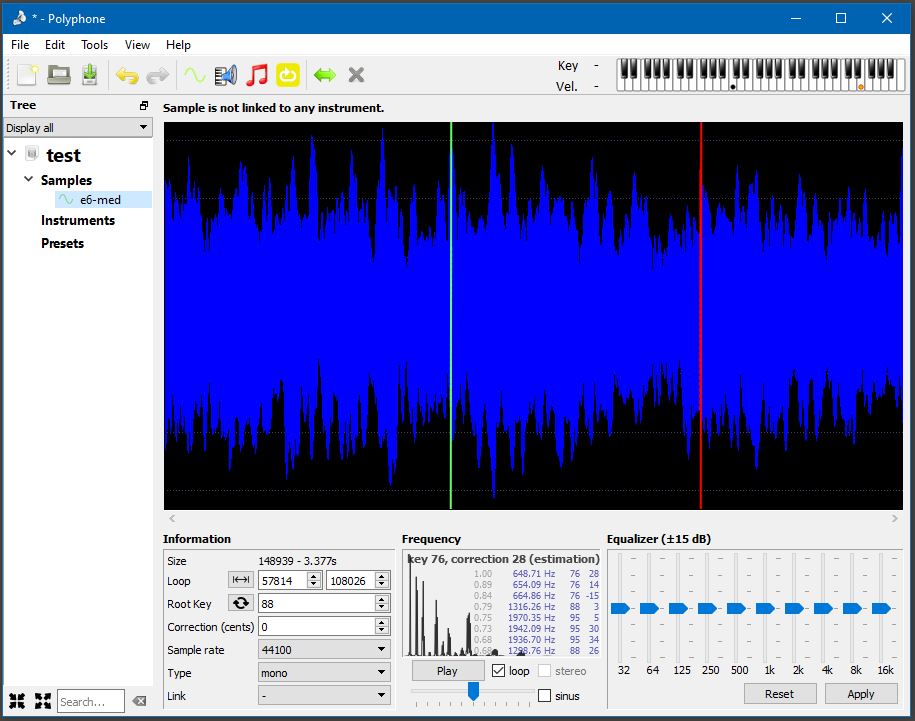
The idea is that you load up a waveform (you can just drag and drop a wave file) then look for a range within that waveform where the waveform looks relatively stable. While holding the Ctrl and Shift keys, drag the mouse to highlight the area where you want Endless Wave to look for good looping points and it will quickly perform a search and place a start (labelled “S” above) and end marker (labelled “E”). You can then listen to the loop. Often that’s all that’s necessary. but if you are not happy with these loop points, you can perform fine adjustments a single sample at a time, move the start or end makers to the next or previous zero crossing or simply mark out a different region and have the software search again for new start and end points.

Once you are satisfied, save the looped waveform and move on. Sometimes, depending on the variability of the waveform, it may be necessary to add a cross fade between the end and the beginning of the loop to smooth out the transition. To do that, drag the handle that is labelled “X” to the left a little or a lot depending on what sounds better. There are also 4 different types of crossover curves from which to choose. Which curve works best will depend on the waveform and the size of the crossover you’ve chosen.

Some waveforms loop very easily, others require a few tricks to make them loopable but this tool has certainly been indispensable to me.

There is further help information at the above link, and the software itself pops up a little bit of help information when you hover the mouse cursor over the various buttons and areas in the user interface.

Some tips for successful looping:

  • Ensure the “XFADER” button is pressed down (it’s between the two waveform boxes). This mode will display the result of the cross fade in the waveform to the left. If there is a noticeable lump in the waveform, the result will not sound good.
  • Try all 4 different cross fade shape buttons (middle right of the screen). When paired with the above tip, use whichever cross fade shape provides the best looking and best sounding  waveform.
  • After using Ctrl-Shift-mouse-drag to select an area of the wave form to nominate for the loop area, drag the line labelled “x” in the large wave form display to the left to smooth out the transition between the start and end of the loop. Sometimes a small amount of distance between the “x” and “e” lines will sound good, other times a large distance will be necessary.
  • Sometimes a ridiculously short loop will work, provided the resulting waveform is played back with some added vibrato.
  • In general, playing back a looped sample with vibrato is a good way to help disguise the loop point and help the loop to sound less repetitive.

See also: Sample Looping Tool – Polyphone

Sfz Sample Library Building Resources

Virtual Playing Orchestra is an sfz based free virtual orchestra sample library. It’s assembled from other sfz based free sample libraries. These are some of the resources that can help with building an sfz library and understanding the sfz format..

This first link is the list of the original sfz 1.0 opcodes. These form the basis of creating a sample library for an sfz player.

Sfz 1.0 description of opcodes

Some further explanation of the sfz 1.0 opcodes can be found here:

Sfz 1.0 further details

Of course, having an sfz player is very important too. I’ve already posted about my sfz player of choice here:

Sfz player – Sforzando – blog post

There are some additional opcodes introduced in sfz 2.0 but information about sfz 2.0 is hard to find online. Here is a link to a list of the sfz 2.0 opcodes that I found:

Sfz 2.0 opcodes

There isn’t much of a description to accompany the list, but once sfz 1.0 is understood, it’s not too difficult to figure out what an sfz 2.0 opcode does.

Linux Sampler SFZ reference

The above link is meant for the Linux Sampler, but it contains explanations of opcodes and could help understand some of the sfz 1.0 and 2.0 opcodes.

Here are a few online chapters from the book:

Cakewalk Synthesizers: From Presets to Power User

That book is apparently the only place the full SFZ 2.0 specification exists. I haven’t read the book but chapter 13 and the appendix are said to address SFZ 2.0.

This next resource states “This is the main reference point for anyone who wants to create virtual musical instruments using the SFZ format.” The web site looks to me like it’s trying to be exactly what it claims. It’s definitely worth a look.

sfzformat.com

When building my library I also found this list of instrument ranges to be a helpful guide although, I’m uncertain about the accuracy of some of it. For some instruments, I’ve seen video, and heard samples, of instruments being played outside the specified range, so it’s best to double check.

Playing range of orchestral instruments

Finally, although this blog post is mostly about the sfz format, my previous blog post about Looping a sample, taught me how to use the free tool Audacity to determine the values to put in the sfz “offset” opcode. Using the “offset” opcode together with the “ampeg_attack” opcode, and a few others, is the secret to creating a staccato sample from a sustain sample.

A few more related links:

General Midi percussion key map

MIDI CC numbers

Some YouTube videos on creating sfz files:

SFZ Tutorial Part 1: Hello World!

SFZ Tutorial Part 2: Generators , transpose and ADSR